Tag Archives: preon

4Sevens Preon Li-Ion Beamshots – 200 lumens?

I had heard that using a Li-Ion 10440 cell in a Preon 1 could get close to 200 lumens of output, but I was skeptical. I had to try it for myself. While I have no way to accurately measure lumens, I can say that the claim is absolutely believable and I offer you some beamshots as exhibits. (All photos were taken with a Canon T3i set at 1/320, f/4.0, ISO 400)

Each of the following animated gifs shows 2 side-by-side beams from 2 different 4Sevens Preons on low/med/high and the caption below indicates which beam is which:

1-AAA NiMH/2-AAA  NiMH

This is to be expected. The 4Sevens website states that the Preon 2 more than doubles the lumen counts of the Preon 1(70 lumens to 160).

____________________________________________________________________________________________

 1-AAA NiMH/1-10440 Li-Ion

Again, this is to be expected. We are comparing a 3.7v battery to a 1.5v battery.

____________________________________________________________________________________________

 1-10440 Li-Ion/2-AAA  NiMH

This is where I got excited. Not really surprised, but excited that a single cell could so obviously outperform the 2 AAA batteries.

____________________________________________________________________________________________

In Conclusion:

My completely unscientific comparisons found the Preon 1 with the single 10440 Li-Ion battery to be brighter than even the Preon 2 with two AAA NiMH batteries. How much brighter should be measured with a scientific instrument, but I would definitely believe that the Li-Ion Preon 1 is 40+ lumens(25%) brighter than the NiMH Preon 2. It is pretty cool to have access to so many lumens in such a small package.

The batteries used in this comparison were AAA Samsung Eneloops and ICR 10440 350mAh batteries.

The 10440 batteries can be purchased from Super T Manufacturing.

The Samsung Eneloops were purchased from Amazon.com.

Purchase the Preon 1 from Amazon.com for $35

This is not an endorsement for Li-Ion in the Preon and this is not recommended for an EDC setup. The Preon head heats up very quickly and could cause damage to the circuits. Your light will no longer be under warranty. 

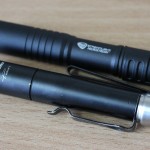
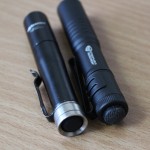
4Sevens Preon 1 Vs. Streamlight Microstream

Before the push button/ clicky tailcap modification that Zodiac Engineering did on my 4Sevens Preon 1, I was searching for a better clicky tailcap mechanism for a AAA light.  I was frustrated by the OEM clicky tailcap on the 4Sevens Preon 1, but I read on some forums that it was possible to remove the glued-on Streamlight Microstream head and use it’s body with the 4Sevens Preon head(with a much better interface).  I received my Streamlight Microstream about a week ago and immediately started carrying it to get a feel for the push button.  I have to say that I’m not impressed.  My biggest complaint is how difficult the button is to depress.  On my light, it starts out with the same required pressure as the 4Sevens Preon, but as you reach the bottom where the switch will click, it requires more and more pressure.

Yes, the extra pressure makes it less likely to be turned on in your pocket, but when you are frequently using the light, it makes life miserable for the user.  I’ll continue carrying it for a little longer to see if it grows on me, but as of right now, I’m ready to head back to the 4Sevens Preon 1 with the push button/ clicky tailcap modified by Zodiac Engineering.

Here are some photos comparing the 2 lights:


4Sevens Preon Clicky Tailcap Modification by Zodiac Engineering

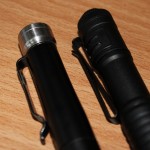
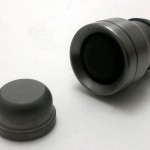
I saw a photo of a modified Titanium tailcap on the Zodiac Engineering website back in November and e-mailed Ken about doing the modification for me.  I shipped him a Ti clicky tailcap directly from 4Sevens and 7 days from his receipt, it was out the door and on the way to me.  He was also kind enough to take some Work-in-progress photos for us all to drool over.  The white background photos are his.

I’ve been using it for several days now and I love it so far. The switch is completely recessed and it’s nice not having to worry about accidentally activating the light when I sit down.

The modification does widen the contact/resting surface and shorten the flashlight a little.  Both characteristics make the light more stable during tailstanding.

The pictures may make it look a little bulky, but the clicky tailcap actually only adds ~10% extra length(Preon 1).

  • Regular static tailcap – 76mm
  • With modified clicky tailcap – 83.5mm

The tailcap width is the exact same as the head(no extra width) and the extra weight is negligible(it’s Ti).

Obviously, every flashlight is a personal decision, but for me, the clicky tailcap is worth the small increase in size.

I can honestly say that I can’t notice a difference when carrying it, even when I’m trying.

In my opinion, it was totally worth the $16+shipping.  It made my favorite little light even better.

So what do you think?

Click on any of the images for a better view:

Modified 4Sevens Titanium Preon Tailcap

Yesterday, I posted about a 4Sevens Preon clicky tailcap modification from Zodiac Engineering.

Here’s what I wrote:

I saw your photo of the modified preon tailcap.  Is that a service you currently offer? At what cost?  Can you tell me any more about the modification?

I received the following response today from Ken at Zodiac Engineering:

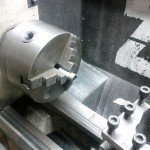
Modification consisted of removing the titanium cover and turning down the remaining cap flush with the rubber boot then adding a large chamfer on the ID to allow your thumb to still activate the button.

Modification runs $16 plus return shipping.

So they are removing the metal cap and pressing the rubber boot itself to actuate the switch.  Hmm…

I’m willing to try it out if they do the mod on the regular(non-titanium) tailcaps.

I also wonder how the rubber holds up to heavy use?


Modified 4Sevens Preon Titanium Push-button Tailcap

According to the Zodiac Engineering website:

Modified @4Sevens Titanium Preon 2 tailcap. Titanium cover removed, retaining ring faced flush with the rubber cover and countersunk deep at 45 degrees to allow access to the switch. This allows the user to stand the light on end as a candle and still retain the guard around the switch to not accidentally turn it on when pushing down into your pocket.

I like the concept of an improved 4Sevens Preon clicky tailcap and I’d love to see how this turned out.

No price is given, but the information was posted two months ago.  I emailed for more information…

4Sevens Preon Modification

Those of you that read my review of the 4Sevens Preon 1 saw that I had a problem with the 4Sevens Preon clicky tailcaps.  It seemed that they collected every piece of dirt or grime within a 20 mile radius.  I had numerous issues with the clicker sticking in one position or the other.  I had heard better things about the tailcap mechanism from the Streamlight Microstream, but I wasn’t too impressed with the light itself.

But what if you could combine the emitter and the guts of the 4Sevens Preon with the body and clicky tailcap(push button) of the Streamlight Microstream?  I hear that you can.  Bear in mind that I have not verified or done this myself yet, but I have read this on three different occasions from three different sources.

I understand that it’s not a quick and easy removal, but it is possible.

Most recommended placing the Microstream body in a vise and using a heatgun(or hair dryer):

 Slowly heat the threads and after every couple of seconds you need to try to twist the head off.  It’s all about slowly heating and twisting the head every couple of seconds. That way you’re not melting the body and head together.

This is not the only way. Someone else had this advice:

Ziploc baggie, boiling water, and a (very) small strapwrench does the trick every time.

Basically, with a little patience you can combine the two lights.

When I get my Microstream, I’ll get some photos while I do the work and let you all know how it goes.

Have any of you already done this?  I’d love to see some pics…